We’ve touched upon our 18th Day, or 18th task from last time. And now, I thought about exploring task briefing for Day 19.
I can’t access it yet. Since, Kode Kloud’s system prevents access to lab exercises when we’ve not done a preceding pre-requisite lab (in this case, lab exercise for Day 18th).
With this, let us re-trace our steps, for according to Kode Kloud’s web interface we haven’t cleared Day 18’s task yet.
We need to go back to that one first, before attempting Day 19’s task formally. Okay folks?
Let’s park this one for now. And then, we return to this post after.
That’s it for now – thanks.
And folks – please keep yourselves well over where you’re at. God bless.
Folks, good evening from a small space inside the wonderful, and beautiful archipelago (you’ve got to see some of the places here, not just off photos or videos, okay folks?) of forested hills, mountains, and a myriad of islands: the Republic of the Philippines.
A land of good cheer, hope drawn from grounded optimism, and resilience through our shared faith in the Almighty God.
How do you do, my dear brothers and sisters? How’s it going?
Hmm.
You know what?
Tonight, my night-time slumber was abruptly interrupted – with me needing to go to the bathroom – to take a leak.
After this, I scrolled a little off my telephone. And found myself already wide-awake from the stimulus of the bright screen, and whatnot. Then, I decided to get up from bed. And start my computer to do some learning. And, well since we need work, hopefully soon, at the side, to continue hunting for a job, online.
Folks, kindly include me in your prayers. I need to find and land a job.
Alright.
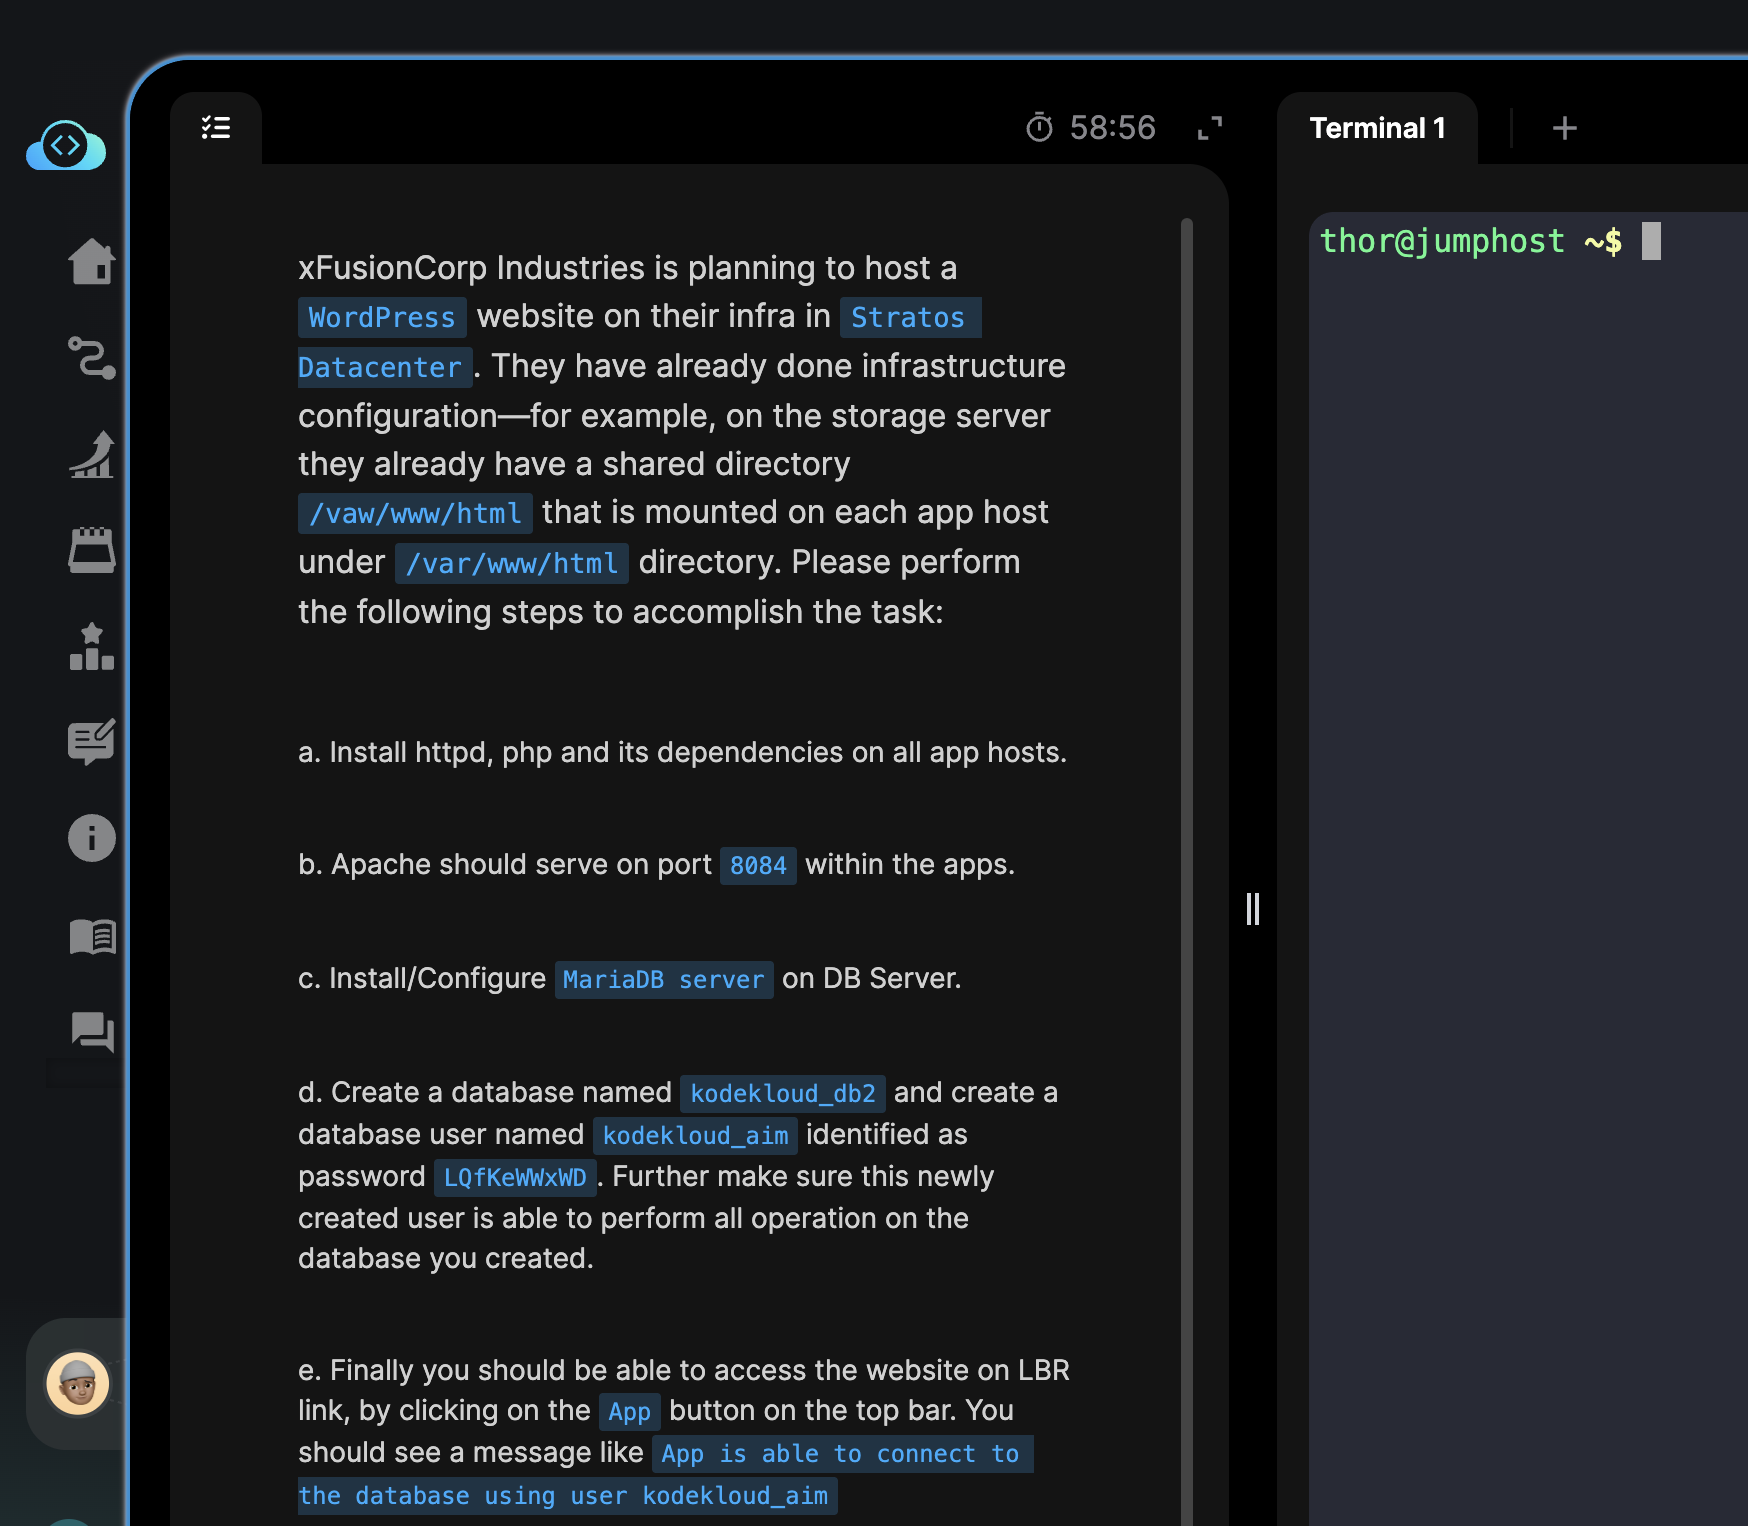
My dear friends, our Day 18 task briefing is the following:
xFusionCorp Industries is planning to host a WordPress website on their infra in Stratos Datacenter. They have already done infrastructure configuration—for example, on the storage server they already have a shared directory /vaw/www/html that is mounted on each app host under /var/www/html directory. Please perform the following steps to accomplish the task:
a. Install httpd, php and its dependencies on all app hosts.
b. Apache should serve on port 8084 within the apps.
c. Install/Configure MariaDB server on DB Server.
d. Create a database named kodekloud_db2 and create a database user named kodekloud_aim identified as password LQfKeWWxWD. Further make sure this newly created user is able to perform all operation on the database you created.
e. Finally you should be able to access the website on LBR link, by clicking on the App button on the top bar. You should see a message like App is able to connect to the database using user kodekloud_aim
Folks, details encapsulated within this task briefing may change over some time. Especially, as I also need to re-open this task later on, when the virtual machine that our lab exercise runs on shuts-down.
Okay.
Let’s get started.
My friends – apologies – for now, I’m going to go back to sleep. For the night. I still need some more sleep.
If and when I wake up next morning, I’ll return to this task of our’s. Okay?
God bless.
Peace be with you all, my dear friends in Christ.
Folks, it’s lunch time over here.
Me logged into a computer terminal. Contemplating if I should defer this activity of ours’, our Day 18 of 100 Days of DevOps, for tomorrow instead?
Sorry.
There’s a few more learning tasks I need to set aside some time for. It’s my fault. I didn’t spend enough time on this one earlier in the morning.
In addition, I may have slept through my alarm ringing.
Folks, like you – I’m also doing what I can, with what I still have going.
And this entails, we devote our time to learning and study. Now, when it comes to the nitty details – we also need to block off spaces of time for topic areas we’d like to learn.
Okay, my friends? I’m more like a college student nowadays, with me unemployed.
It’s okay. Things will look up – in God’s time.
For now, we need to remain faithful. At least, we do our best as ever-striving servants, disciples of Christ, our Lord.
Peace be with you all, my dear brothers and sisters.
Pray for me, my friends. Let us keep praying and let us keep trying.
Several days ago, we were doing our 16th Day of 100 Days of DevOps. It was going well, until we had to check our work through Kode Kloud’s system.
At that, we hit an error. Sorry folks, from time to time – we will inevitably make mistakes, and errors here and there.
The good thing is that, we do learn a lot from our own mistakes. Yes, my brothers and sisters?
Unfortunately, folks we failed to fully do the 16th Day task. It’s okay – we’ll have to try again. Hopefully, some time soon. If God is willing.
My friends, I had been thinking about doing a restructuring of my own training and study plan.
I’m sorry brother and sisters – I can’t properly do it without making an effort to balance what I still have in my waking hours.
Apart from family, whom I’m not always able to attend to nowadays, sorry, while I have time in my hands due to unemployment – I’m what they call “doubling down” where I can with study.
With a goal to find, and land a job for a well-meaning company of friends. Through, first becoming more equipped, and reaching nearer to readiness required. Okay, folks?
Without studying – I don’t feel I could compete well enough. This is one more driver among other varied reasons. Why we need to keep learning.
Alright, with these things said.
Folks, I’m going to write and attempt doing Kode Kloud academy exercises – for around 3x times a week.
The remaining 2 weekdays, I need to devote to training in a slightly different way.
When weekends come – sorry, but I need to drop training mostly, and come to a rest.
Folks, we all need rest. And time to ourselves, either in recreation or in reflection.
I’ll start implementing this simple rule, I need to set simple rules for myself, otherwise, I can’t become or grow consistent enough. If the rules or guidelines I set for myself, are too complex.
I need to simplify what I can simplify.
Simple for me, means I have a chance of growing enough to become consistent at it, well, over the passage of time.
These are also some of the things I learned from others. What I learn are all from other people. We’re nothing, without all our teachers, mentor(s), family, and coach(es).
Yes, folks?
I share that belief, that no single person – is a self-made person. We constantly need others’ help.
More notably, from our holy Catholic priests, nuns, deacons, and our other brothers and sisters (more spiritually-mature than I will ever be) from the universal (meaning, Catholic) church of our Lord Jesus, the Christ.
And also, from others in our secular world. I learn from books, podcasts, and other what-not. Such as a contemporary book about ancient stoic teachings – viewed in our modern world’s lens. And I have to say, that it’s quite helpful, folks. Insightful, and full of things we can apply in our own lives.
But, be careful too, my friends, first, let us also let what we learn pass through the gates of our Christian faith. Particularly, our compass drawing from Christian Theological traditions, and also, from Holy Scripture.
We need to ask the Holy Spirit of God, to be with us – to guide us, and our minds and hearts.
Friends, we can do this (to ask for this grace from God) – through sincere, fervent, and regular prayers.
Okay, that’s it for now, my dear friends in Christ.
I hope you’re feeling well, and good this warm afternoon. Well, for me over here – weather’s becoming warmer with the onset of lunchtime.
Sorry, I haven’t been turning-on my room’s air-conditioning unit for some time now – to also help save on electricity cost. Especially, while I’m unemployed – I have to help keep costs down a little.
Anyway, going beyond this…
My friends, for today we have a new task from teachers and our other smart friends at Kode Kloud academy.
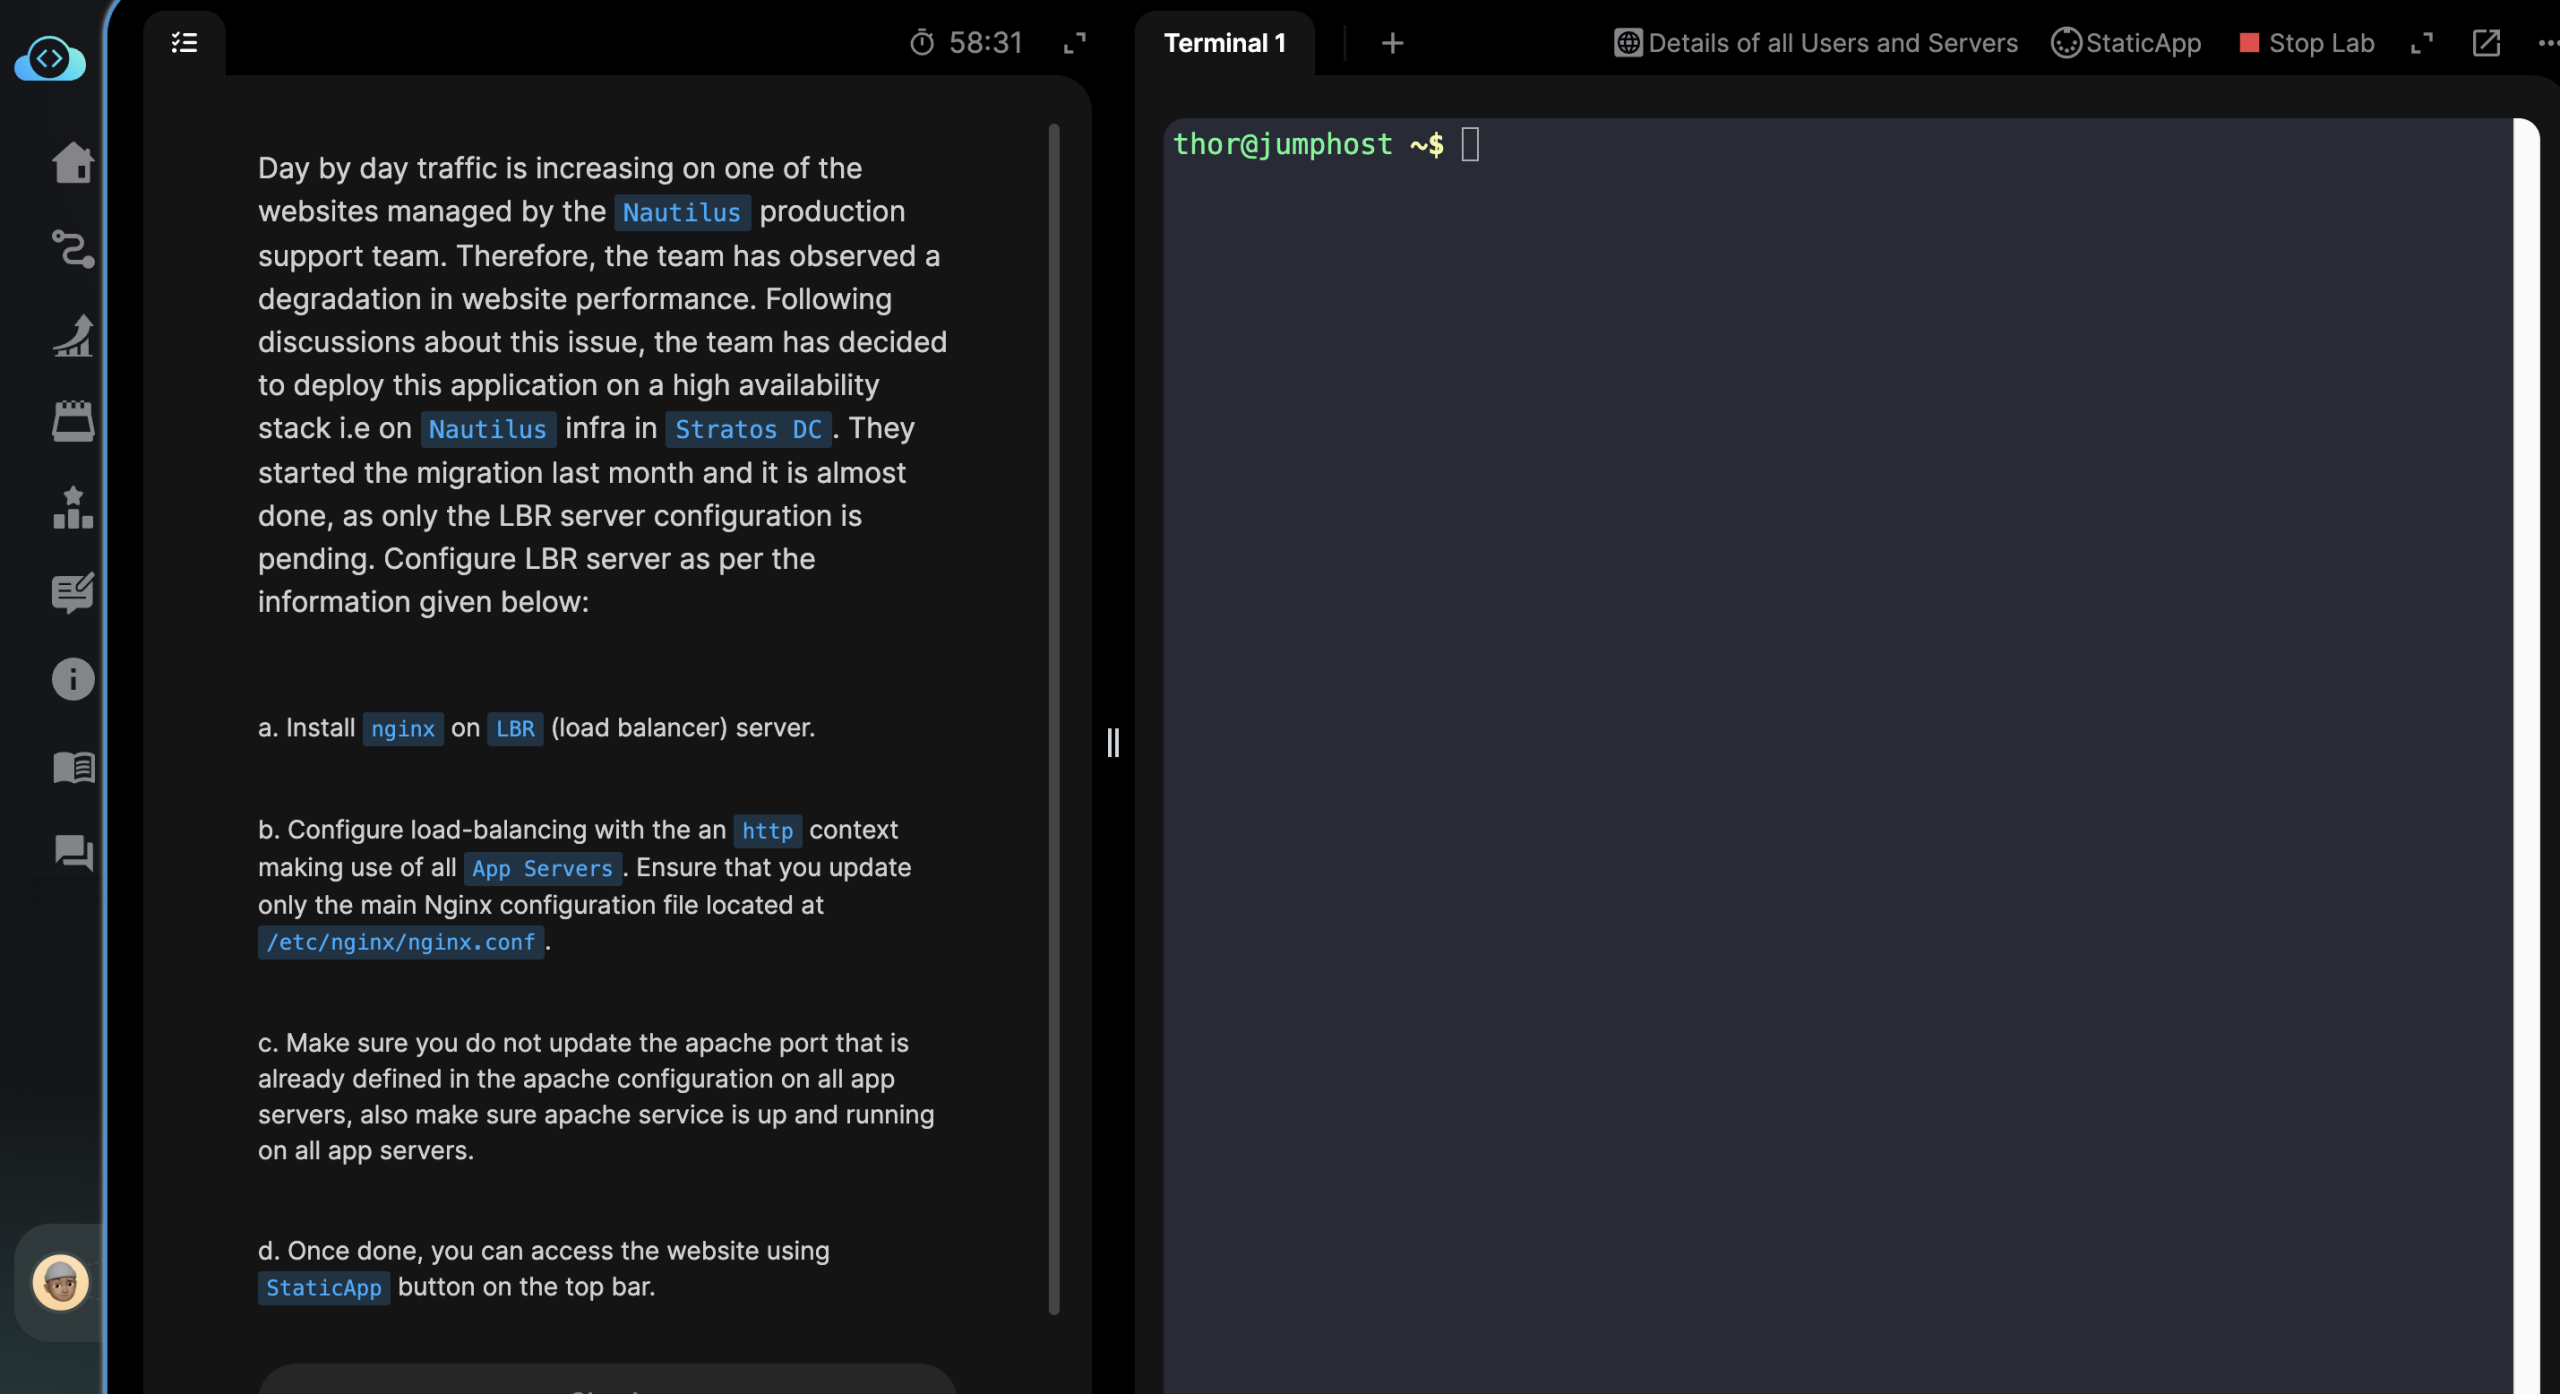
Kindly refer to the following task briefing:
Day by day traffic is increasing on one of the websites managed by the Nautilus production support team. Therefore, the team has observed a degradation in website performance. Following discussions about this issue, the team has decided to deploy this application on a high availability stack i.e on Nautilus infra in Stratos DC. They started the migration last month and it is almost done, as only the LBR server configuration is pending. Configure LBR server as per the information given below:
a. Install nginx on LBR (load balancer) server.
b. Configure load-balancing with the an http context making use of all App Servers. Ensure that you update only the main Nginx configuration file located at /etc/nginx/nginx.conf.
c. Make sure you do not update the apache port that is already defined in the apache configuration on all app servers, also make sure apache service is up and running on all app servers.
d. Once done, you can access the website using StaticApp button on the top bar.
Hi folks, how do you do?
Good morning!
Alright, let’s get started with our task from Kode Kloud.
Thank you, my friends – for being with me.
SSH, or log into our LBR server
ssh loki@172.16.238.14
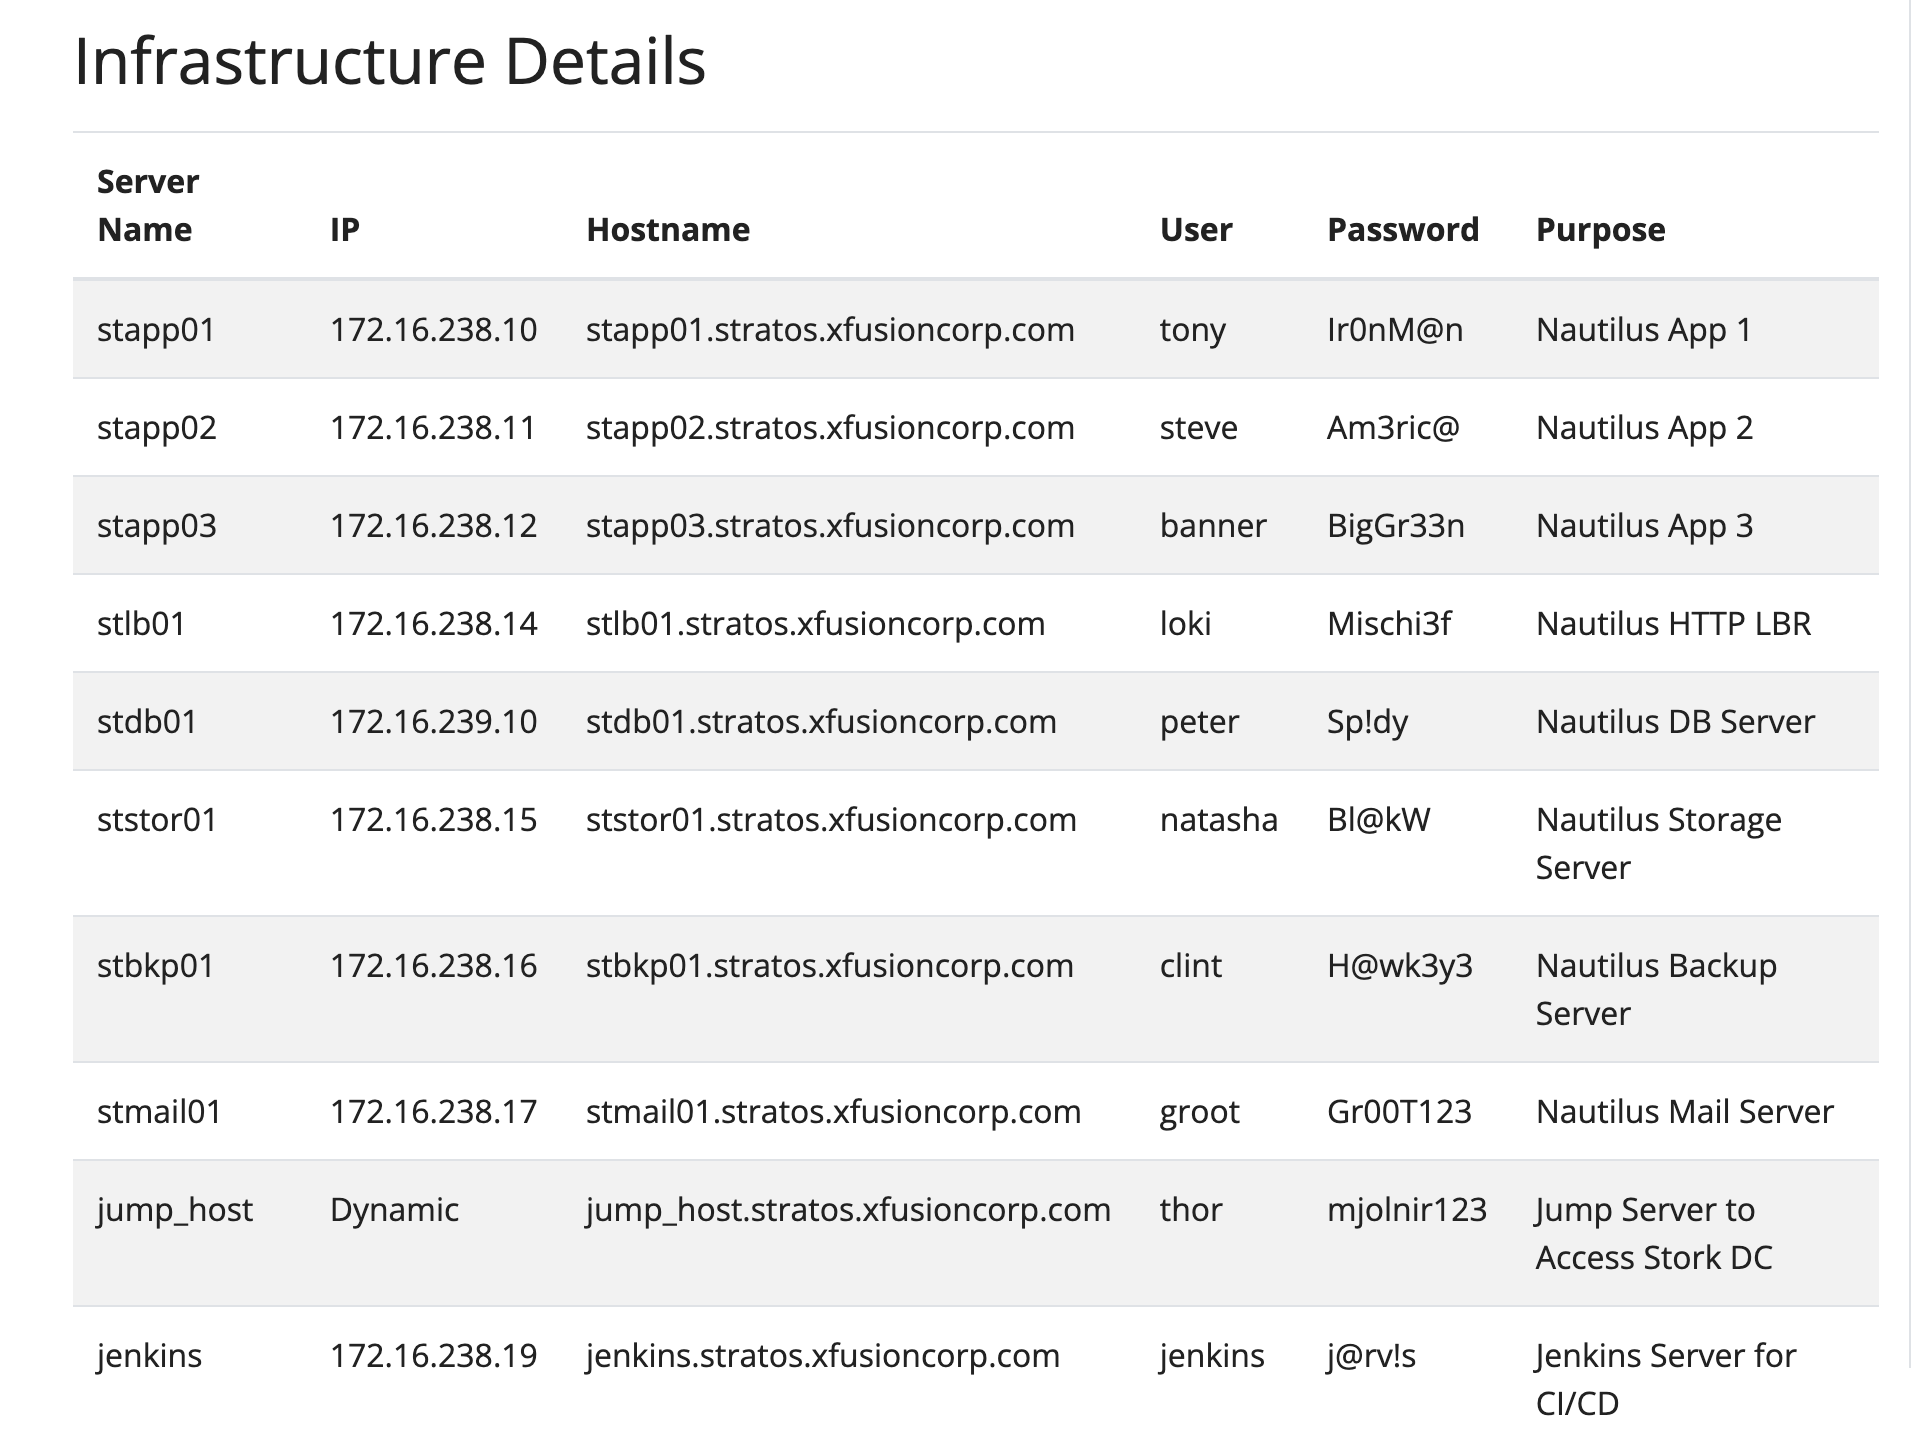
For necessary context, our resources infrastructure details can be found at the following table:
Enter our server password.
Then, we should be able to login.
It may be prudent to check our LBR server’s Linux distribution, my friends.
With this, we do the following:
cat /etc/os-release
This should enable us to see more information about the kind of Linux OS we have from our latency mitigation server (LBR).
Okay, with this one – we’re on a Linux instance that’s running a CentOS version 9.
Alright, good.
Now with this information, my brothers and sisters, we need to install necessary software.
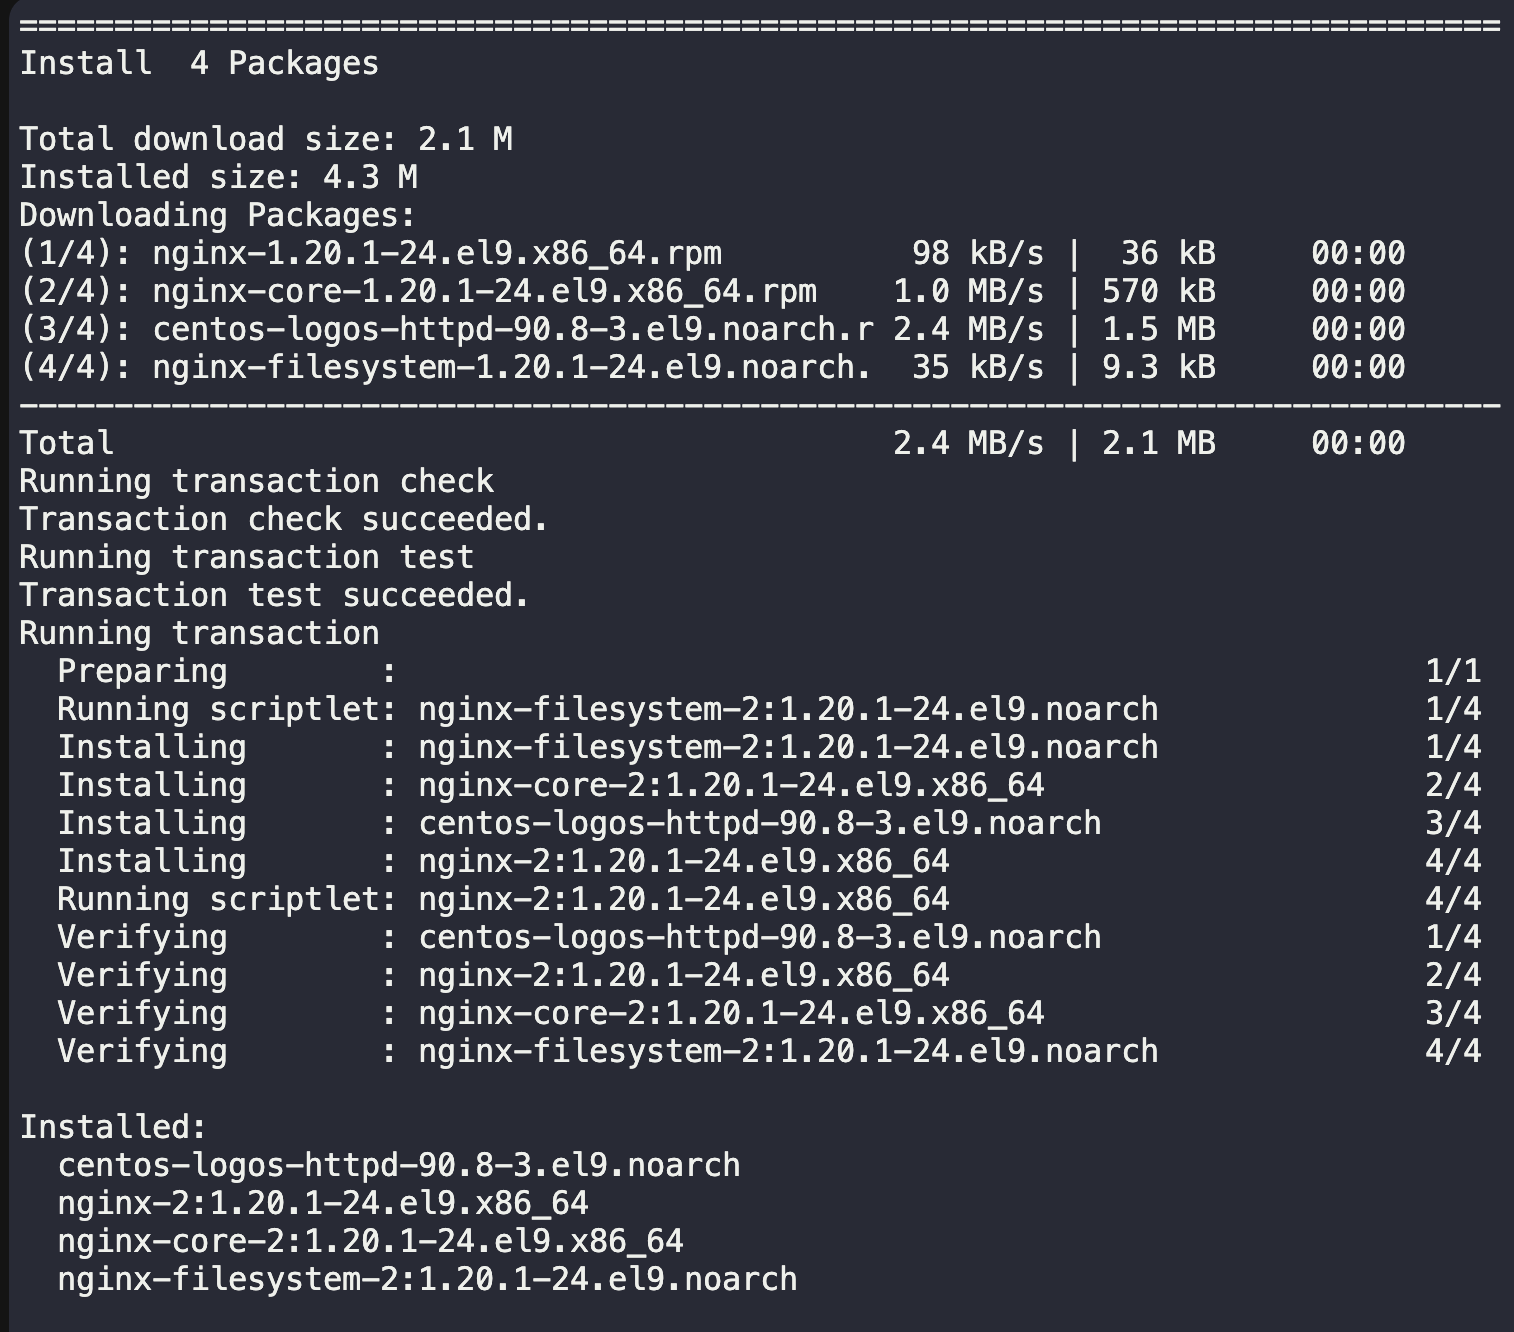
Install Nginx server
sudo dnf install nginx -y
We’ll need to ask Linux to install Nginx, and then wait for the system to finish doing its thing.
Okay, we’re done with our Nginx install. Now folks, we’ll need to configure our software, or server, in this case.
Before we do that, please start your Nginx server, and then enable auto-start upon Linux boot.
Next, my friends we need to check and make modifications (in my case, I’m working with a text-editor app called “vi”. Folks, there’s other text-editor apps available) to a conf (meaning: configurations) file at this Linux path (/etc/nginx/nginx.conf).
/etc/nginx/nginx.conf
Folks, usually the folder or directory at (/etc/) holds configuration files for software we have installed on our Linux instance.
Okay.
cat /etc/nginx/nginx.conf | grep include
We need to look for the include clause from our defaults conf file. So that we can append and annex a new conf file. Without modifying our default conf file.
In this case, our append or include conf path is this one:
/etc/nginx/conf.d/*.conf
Next, my friends, we need to create a new conf file (named: “resource-web-servers.conf”). An empty one first, then we write our new settings to be appended with our defaults.
touch /etc/nginx/conf.d/resource-web-servers.conf
Since our Apache software from our web app servers (from stapp01 to stapp03) listens on port “8088”.
We’ll need to write a separate conf (configurations) file. One which will append to the default Nginx conf file.
# Define the upstream group with all app servers
upstream app_servers {
    server stapp01:8088;
    server stapp02:8088;
    server stapp03:8088;
}

server {
    listen 80;
    server_name 172.16.238.10 172.16.238.11 172.16.238.12;

    location / {
        # Pass requests to the upstream group
        proxy_pass http://app_servers;
        # Include these headers to pass client information
        proxy_set_header Host $host;
        proxy_set_header X-Real-IP $remote_addr;
        proxy_set_header X-Forwarded-For $proxy_add_x_forwarded_for;
    }
}
Next, we need to check our Nginx conf file for errors with the following Linux command:
sudo nginx -t
If and when it checks out without any errors thrown off.
Folks, we’ll need to restart our Nginx service.
sudo systemctl restart nginx
Okay, we’ve restarted our Nginx server.
Now, for good measure we first need to check the status of our Nginx service.
sudo systemctl status nginx
Sorry folks, we failed at this try. Our app is accessible. However, we didn’t get it all right this time.
Our web app is accessible, through our latency server’s Nginx (which is good). We see this “welcome” message accessing our app from a web browser.
However, when we let Kode Kloud check our work.
Oh noes! 🤖
We got a task correctness error. Sorry, folks!
We’ll need to try again later.
According to the error stream. While our app is accessible and working fine. It isn’t being coursed through all our web app servers. Maybe just one or two. We need to have three servers working together for our task to be correct.
For now, I need to get something to eat. I’m already literally hungry. Catch you folks later, okay? I need to go have some breakfast.
Thanks!
Folks, I’ll work on this one again tomorrow, okay? Sorry.
For now, I need to focus on getting myself ready for something that’s also requiring time and effort.
Thank you all, my dear brothers and sisters in Christ.
God bless us all, and every one else.
Rework: September 28, 2025 – Day 16 of 100 Days of DevOps – Latency mitigation service through load balancer
Folks! How are you doing over where you’re at, my friends?
Good evening from our side over here.
I hope every one’s doing well right now.
Okay. Let’s do a rework for our Day 16 task.
We set configurations and append these to our defaults.
Going forward, folks, we’ve had another failure. Sorry. This was the result from after we’ve ran our task checker.
We’re doing something wrong along the way.
I feel the conf file for our Nginx fails to satisfy a correctness criteria from our folks at Kode Kloud. This means, that while our app works fine. It isn’t behaving the way it should when load is given or applied to our system.
We’ll need to try again, alright folks?
Attempt 03: 29th September, 2025
Alright, let’s try again folks.
upstream app_servers {
server stapp01.stratos.xfusioncorp.com:[port number];
server stapp02.stratos.xfusioncorp.com:[port number];
server stapp03.stratos.xfusioncorp.com:[port number];
}
server {
listen 80; # "Avoid using a port that conflicts with other ports in the configuration file by changing it to a unique port number."
listen [::]:80;
server_name _;
location / {
proxy_pass http://app_servers;
}
error_page 404 /404.html;
location = /404.html {}
error_page 500 502 503 504 /50x.html;
location = /50x.html {}
}
Folks, I found this conf file – which looks similar to what we’ve been putting across from our earlier attempts, that sadly failed.
We’ve been doing something wrong. It seems our conf file is missing a few things. And we also need to remove a bunch of other things, too.
Greetings, from a small space somewhere to the east.
Sorry folks, I was on battery-saving mode today. 😅 Needed some charging up of 🪫⚡ batteries.
Friends, it’s night-time over here. I recalled this web journal, and I need to write something here. For one, as we’re doing some job-hunting, it is for good measure (and also to up our chance of getting hired for work) that we put up this small space online. A web portfolio of thingamajig.
With this, we have this task from our good friends at Kode Kloud.
The system admins team of xFusionCorp Industries needs to deploy a new application on App Server 1 in Stratos Datacenter. They have some pre-requites to get ready that server for application deployment. Prepare the server as per requirements shared below:
1. Install and configure nginx on App Server 1.
2. On App Server 1 there is a self signed SSL certificate and key present at location /tmp/nautilus.crt and /tmp/nautilus.key. Move them to some appropriate location and deploy the same in Nginx.
3. Create an index.html file with content Welcome! under Nginx document root.
4. For final testing try to access the App Server 1 link (either hostname or IP) from jump host using curl command. For example curl -Ik https://<app-server-ip>/.
My brothers and sisters, sorry for this one – but I have to step somewhere else for tonight. Likely for me to go to sleep soon.
I’ll return here tomorrow morning – well, hopefully – to do our attempt for this task for Day 15 of 100 Days of DevOps.
Alright, folks?
Thanks, that’s mostly it for now. Sorry my friends, not much for tonight.
See you folks tomorrow.
Ciao!
Restart: Task – 17 September, 2025
Folks, how are you doing today?
Come, let’s get started with our task from our friends at Kode Kloud.
We have this following our task reload. Our web app server becomes “stapp03” (web app server 03) – earlier from “stapp01” (web app server 01).
First, we SSH into web app server 03.
ssh banner@stapp03
After SSH connection establishes, we enter our server password.
Folks, the following is what we call an infrastructure details table. You’ll find pertinent information about our server machines or instances from here. Like passwords, and server IP addresses.
Okay friends, once we’re in. We need to install the necessary software, in this case, “Nginx”, one of the versatile web servers available for free.
Install Nginx
sudo yum install nginx -y
After installation, we start and enable the Nginx service.
Folks, sorry, I understand the Linux command above looks like “spaghetti code”. 🍝
Since I need to catch up on some needed book read before I go to sleep later on.
Let’s revisit this one later, and unpack the Linux commands above (it’s a chained series of Linux commands, not a singular one, but a compounded set of commands)
My brothers and sisters, this set of Linux commands moves the necessary things (a certificate, and a key) to the right directory, or Nginx folders.
We check if our configuration file is free from syntax, or format errors with the following Linux command.
sudo nginx -t
And then, if our parsing our configuration file outputs an OK message. It means our configuration file is free from errors and so forth.
We will need to restart our Nginx service.
Create our Index file
We do so with the following, my friends.
echo "Welcome!" | sudo tee /usr/share/nginx/html/index.html
Folks, this Linux command asks Linux to create an HTML file (named: index.html) with a text content saying “Welcome!”. At this directory, or Nginx folder path (/usr/share/nginx/html/).
Team, we must ensure that our index.html file doesn’t have any other context – other than the text words saying “Welcome!”.
sudo vi /usr/share/nginx/html/index.html
Kindly remove all other possibly pre-existing content from the file. And retain only the words, “Welcome!” at the starting line.
We do some needed tests to check our Nginx Implementation
Folks, exiting our web app server. And returning to our jump-host, we must do the following:
curl -Ik https://stapp03
Or, this one should also work just fine, my friends.
curl -Ik https://172.16.238.12/
This fetches HTTP data, or page from a secure SSL connectivity. I believe, most website pages nowadays do the same when you browse the web.
If this Linux command is able to successfully fetch the page for us, then we’ve done our task, my dear friends.
For context, you might see that the web app server above (picture) is no longer “stapp03” but “stapp01”.
Earlier, I ran out of time. And had to restart our task for another time. Resulting in the system changing our task server instance, due to a possible randomizer (I believe, it’s built-in with their automation).
Okay, that’s it for now, my dear friends.
Well done, folks! 👏
Good job, team! 😄
See you all next time, alright friends?
And, one more thing – next time – I’ll publish necessary improvements from our previous posts. One at a time, we’ll gradually do needed changes to our past posts. This, to reach desired improvements. Okay, folks?
Let’s get started with our Kode Kloud DevOps learning and some hands-on practice task, from our good friends at Kode Kloud.
We give our thanks.
For this chance to keep learning. To grow our skills.
Okay.
For today, we have this task from our web-interface briefing.
My brothers and sisters, please look at “Day 14 – Linux Process Troubleshooting” from the following:
First off, let’s have some coffee goodness. ☕
Caffeine ⚡ helps during the morning, my friends. Yes?
Let’s make coffee(s) ☕, not war(s) 💥 – okay, folks?
Peace be with you all ☮️, my dear brothers and sisters in Christ 🕊️.
Folks, please pardon me for this, but, before I can continue writing this post for today – I need to work on our laboratory exercise first – okay?
I need to do it differently this time, I’m sorry.
If you look at my previous posts from the past recent weeks. What I did there was to write ’em posts while doing our laboratory practice tasks at another side. It isn’t conducive, also, it’s a disservice to you readers and fellow-learners, because my posts are lousy, and the details suffer.
With this, I’m going to make some changes to how I write our posts here.
One, I need to do the practice laboratory first, hopefully finish it and for me to get past the task-checkers. Only after this, can I continue on writing our post for the day.
Doing it this way, is helpful. I can focus on the task, it also helps with my own learning journey (again, I don’t know it all, alright folks?).
For now, I’ll head over to our web-interface where we can work on our task for the day. Okay? I’ll see you folks later. Well – that’s if I can get it right. Hehe. 😆
Thanks, take care – that’s it for now.
God bless. 🙌
Continuation – September 15, 2025
Hi! Hey folks!
It’s already Monday lunch-time (from our local time over here), 15th of September.
How are you?
Friends, let’s continue going forward with our task from Day 14 out of 100 Days of DevOps. Alright?
Okay.
We have the following task briefing from our folks at Kode Kloud:
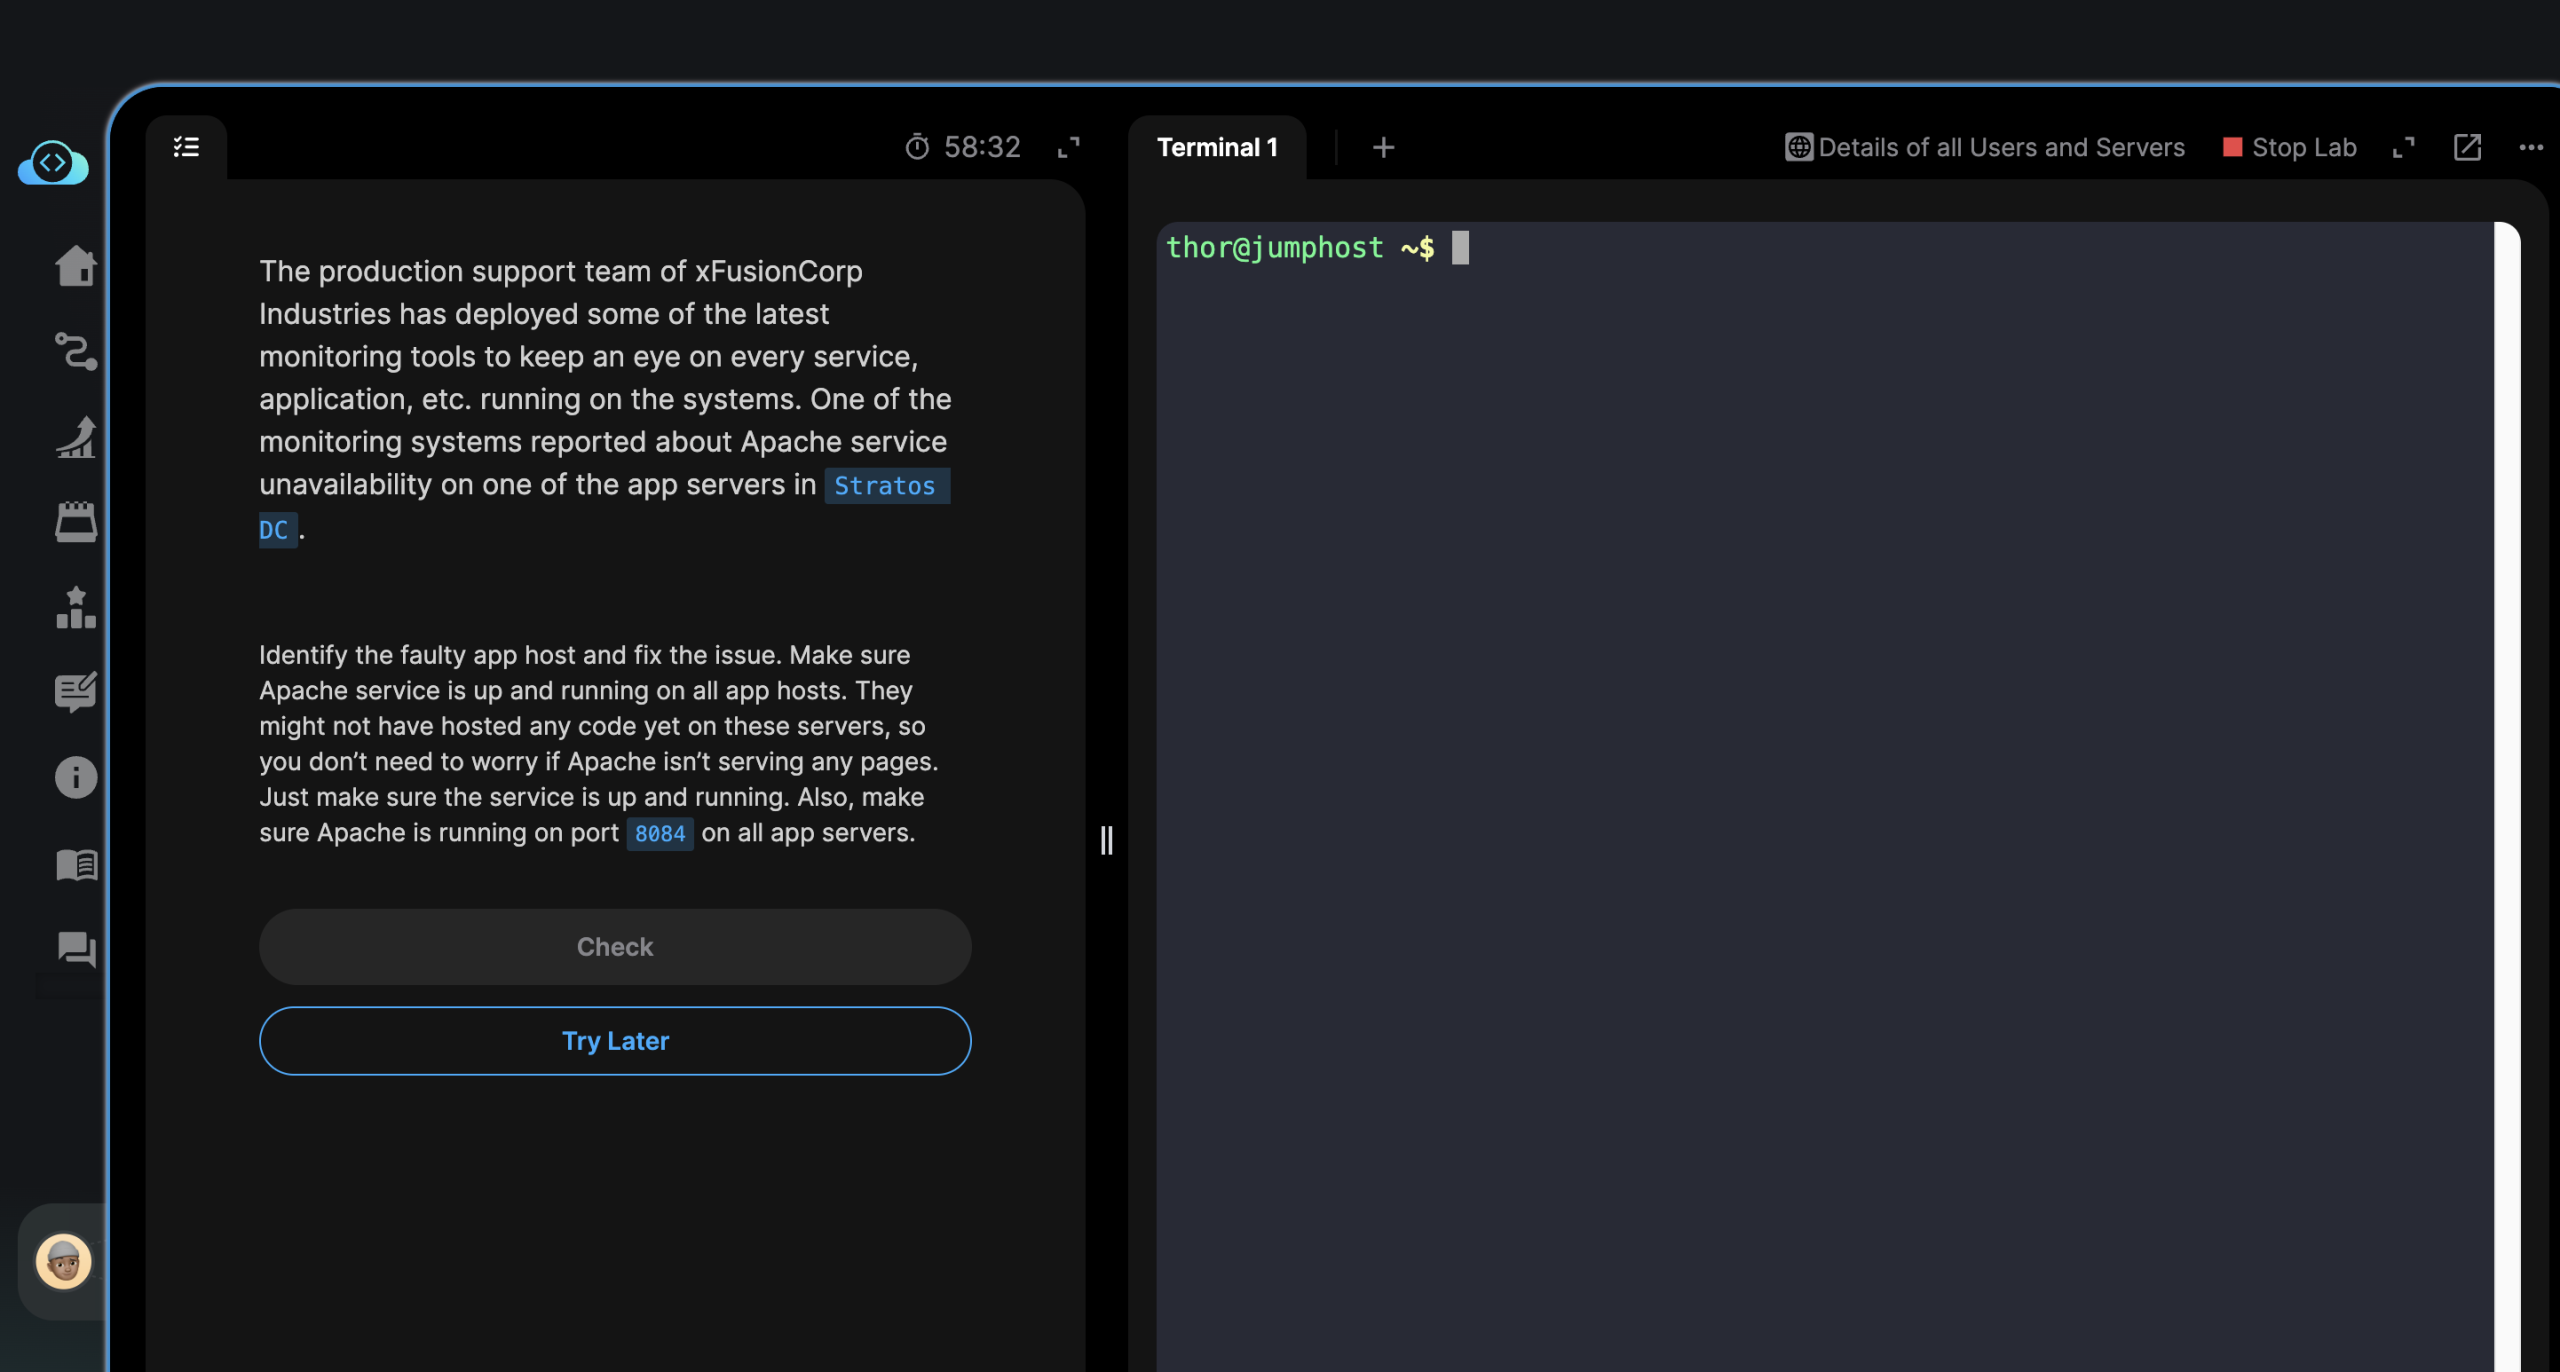
The production support team of xFusionCorp Industries has deployed some of the latest monitoring tools to keep an eye on every service, application, etc. running on the systems. One of the monitoring systems reported about Apache service unavailability on one of the app servers in Stratos DC.
Identify the faulty app host and fix the issue. Make sure Apache service is up and running on all app hosts. They might not have hosted any code yet on these servers, so you don’t need to worry if Apache isn’t serving any pages. Just make sure the service is up and running. Also, make sure Apache is running on port 8084 on all app servers.
Okay.
According to our task briefing: we have one server (we don’t know which of the 3 app servers) that has an Apache service not running.
We’ll need to check each one, my friends.
We begin with our web app server01.
SSH into our web app server 01 with this Linux command:
ssh tony@stapp01
Okay, we’re in.
Good work, my friends.
Hmm. Folks, if you need to bring up our infrastructure details. Please look over this table over here:
We check our Apache web service status (process known as “httpd”).
Remember to escalate privileges into “root”.
sudo su -
As, we will need to do some checking and if necessary some troubleshooting of a system service.
If we don’t escalate our privileges. Sorry, we won’t be able to do our task. Linux won’t let you. Root privileges means administrator access.
Okay.
Let’s continue working together, my friends.
We check httpd (Apache web server) status currently, with this one:
systemctl status httpd
And we have the following print out.
What this text from our command-line interface is telling us: is that our Apache service (httpd) is encountering an issue, and fails to start.
systemctl status httpd -l
We do that status check request once more, but, this time, we ask Linux to be more “verbose” with the error print out.
This way, we will have more information about the error.
It helps with our troubleshooting and fix attempt.
Folks, if you read the error stream. It tells us that our Apache process is encountering a port conflict issue.
Which could mean that something else is utilizing a defined port we need Apache to do its work from.
Okay.
And now, before checking for that – we first need to verify if Apache (httpd) is set or configured to utilize port “8084”, as said from our task briefing.
We invoke Apache’s configuration file.
sudo vi /etc/httpd/conf/httpd.conf
And find that Apache’s configuration file has a pre-existing definition to work on port number “8084”.
We exit our text editor program. Enter “esc” followed with keys “:q” for quit program.
And continue our troubleshooting task.
From our httpd status check, we determined that something else, another system program is using the same port “8084” that Apache needs to work.
We try to investigate a little with our internal connectivity, with the following.
sudo netstat -tulpn | grep 8084
My friends, this Linux command invokes a program called “netstat” to look for anything that listens, or utilizes port number “8084”.
What we find, is that there is another program component that’s already listening on port number “8084”.
We need to know further. So we dig a little further. With the following:
ps aux | grep sendmail
This Linux command asks the system to display processes currently running relating to a program called “sendmail”.
We need to look further, because we found that a component of sendmail is using port 8084.
From the program output, we find that a process ID (number 776) is listening on port 8084.
We must quit that process – to free up port number 8084, for our Apache web server.
sudo kill 776
This forces Linux to quit or shutdown the process ID 776. And frees up port number “8084”.
After verifying that port “8084” is now free.
We must ask Linux to restart our Apache web service.
systemctl restart httpd
After checking if Apache web server is now properly running or functioning.
systemctl status httpd
Okay, now we have Apache web service running properly on our web server 01. Good job, folks!
Next.
We need to determine if our other web app servers (steve@stapp02 and banner@stapp03) have their Apache web services running well.
SSH into server 02:
ssh steve@stapp02
Access administrator “root” privileges:
sudo su -
Then, input this Linux command on each server, so that we can determine how’s their Apache service doing.
systemctl status httpd
Repeat the Apache status request for server 03.
Finally, SSH into server 03.
ssh banner@stapp03
Enter administrator mode through this one:
sudo su -
Then, invoke a status check for our Apache service.
systemctl status httpd
Okay.
Good work so far, team! 🙂
To do a recap:
After doing needed troubleshooting, we have our Apache web service back up and running on our server 01. We also checked that the same web service (Apache) is running well from servers 02 and 03.
From my side, I hope you’ve all had a restful evening last night. For our other friends who may be from a different timezone, all the same, I hope you guys are well right now.
Thanks for being around with me here. Okay?
Alright.
Let’s begin our task? Yes?
My brothers and sisters, for today, our task from our good and smart folks at Kode Kloud education, is the following:
Our monitoring tool has reported an issue in Stratos Datacenter. One of our app servers has an issue, as its Apache service is not reachable on port 8086 (which is the Apache port). The service itself could be down, the firewall could be at fault, or something else could be causing the issue.
Use tools like telnet, netstat, etc. to find and fix the issue. Also make sure Apache is reachable from the jump host without compromising any security settings.
Once fixed, you can test the same using command curl http://stapp01:8086 command from jump host.
Note: Please do not try to alter the existing index.html code, as it will lead to task failure.
Good, good.
We have a task to do. We give our thanks.
And as they say, let’s get crackin’ folks! 😀
Coffee really is doing its thing right now. ☕
Yah, know – good ‘ol caffeine fer ‘yah. ⚡
I learned (the hard way, sorry) – too much caffeine really can make you all jumpy and jittery. Haha! 😅
There’s nothing like fresh coffee, warm but not piping, scalding hot, paired with some stevia (or at times, with some sugar – folks, I’m working to cut down on sugar intake for health concerns too).
For me, I think I want to appreciate the coffee itself. So, most of the time, I don’t add anymore milk, or creamer.
Some coffee goodness – you can’t go without it.
Okay.
Computer Networks are still something I’m working to learn further, folks. Still – okay, let’s do what we can, shall we?
I think, that’s really the most that could be expected from out of us, or, anyone really. We’ll give it our best effort, and then, we’ll keep trying (and we’ll try to keep learning too).
We have this, so far…
Our curl request failed.
Yup! We have existing network troubles. Computers, or machines, can’t communicate to each other.
Let’s get to work, folks!
Friends, let’s hop over to our web app server (stapp01).
ssh tony@stapp01
And, one more thing, the following Linux command, this one…
ssh tony@172.16.238.10
Is the same, as the first line of Linux command. This means, that the hostname “stapp01” maps back to this server IP address “172.16.238.10”.
If you want to go into details, I think I remember learning it from one of Kode Kloud’s lectures. Send me a written message here.
Alright, folks?
Okay.
Now that we’re inside web app server 01. We must do our initial network troubleshoot.
And ohh, in case you folks need it, here are the details for our task’s infra. A nice table showing Kode Kloud’s servers’ details for our learning program.
Alright, let’s move forward.
First off, after logging into our web app server.
We must check the Apache web server status.
sudo systemctl status httpd
And we find that it’s encountering failure.
For good measure, we attempt to start our web server, Apache.
sudo systemctl start httpd
Still, we find failure.
We must look into this one, here my friends.
Looking into “journalctl”…
What we find:
Another process could be utilizing our port 8086. Preventing Apache from starting as a web server, that we need.
We run the following Linux command.
sudo netstat -tulpn | grep 8086
Okay, first let’s unpack what this line of command does and asks Linux to do for us.
If you haven’t already escalated your user privileges. We’ll need to “sudo” for this one. Otherwise, it’s likely Linux won’t let you run this command.
“netstat” – is a Linux utility program, specifically for troubleshooting network connectivity between instances, services, and the like.
“-tulpn” – is a parameter that is passed to “netstat” that tells it to look into network protocol traffic, like UDP and TCP, which are all very important stuff. Since we’re troubleshooting, we need to know what’s going on.
“| grep 8086” – this is a transfer to command fragment. A pipe command that tells, whatever is the output of the former program move it as an input to the next program (which is grep). Now, grep is a Linux utility program, a very helpful one, that helps us find things – like text, words, numbers, patterns, etc. Think of it like a search tool. In this case, it will look for any matches with the numerical value “8086”.
Oh, snap! Sorry. We ran out of time, folks! We’ll have to start over, okay?
Re-doing our task, after an initial time-out and failure.
After starting the task again. Now we have almost identical case and details. However, the port got changed from “8086” to “3004”.
Kindly bear this in mind, as we continue our troubleshooting and fix.
Alright, let’s move forward.
We do the following steps…
netstat yielded information that really helped.
It told us that a process called “sendmail” is occupying the same port as Apache web server needs to do its work. Particularly, sendmail is listening on port “3004” which Apache also needs.
Recall please: that when we restarted our task following we ran out of time, the port in question got changed through an automation process, from port “8086” into port “3004”.
Folks, you cannot have two or more things on just one port. Alright?
This is preventing Apache from starting up.
So, we need to disallow sendmail from using port “3004”.
In order to do this, we need the “PID” or process ID of the thingamajig of sendmail that’s specifically using port “3004”.
We initialize this Linux command to find out more:
ps aux | grep sendmail
And we find that PID, or process ID: 449 is utilizing our port “3004”.
We’ll need to shut it down. So that, we can free up port “3004”.
sudo kill 449
This Linux command is like your Windows Task Manager. It tells Linux to close, quit, or shutdown a program or process for this matter.
But first, you need to tell Linux what is the process ID (in this case, it is 449).
Sorry, I understand the word “kill” sounds harsh. There’s no other program or command I know of (from Linux) that shuts down another program.
Now, that we have freed up port “3004”.
Next we start up our Apache web server service.
sudo systemctl start httpd
And… we invoke “httpd” status. My friends, the process called: “httpd” is Apache web server.
sudo systemctl status httpd
Okay.
Apache web server is properly running now.
Very good, folks! 🙂
Curl (from jumphost) that fetches web browser thingamajig is unable to connect to our web app server. We still have connectivity problems, folks. We must keep trying, okay?
My brothers and sisters, after returning to our jumphost. We found that we still can’t “curl” the webpage at port “3004”.
And look! There from the error stream, we find that words “No route to host”.
This is very important. It tells us, something from our web app server is still preventing connectivity between these two machines (jumphost and stapp01).
We log in again to our web app server: stapp01.
And we enter the following. To know if we have a firewall.
sudo systemctl status firewalld
And according to the print out from this Linux command. We haven’t got a Firewall installed yet. 🤔
Since, we don’t have a Firewall. And the curl error tells us there is a routing problem. Then, we could have what we call: “IP tables” issues.
Folks, “IP tables” are like mini, internal security guards. That allow or reject network traffic from going in, or, out of a Linux instance. Much like a Firewall.
We ask IP tables for its status.
sudo iptables -L
And we got these.
Folks, according to this, see the portion that says “Reject”.
The problem is with this last REJECT rule. When the curl request comes in on port 3004, it doesn’t match the rules for SSH, ICMP, or established connections. Therefore, the network packet falls through to the final rule and gets rejected.
We need to allow network traffic going to and from port “3004”. It’s our solution, if it works, then we’re good.
My friends, we input this Linux command to ask IP tables to change something.
Okay, let’s break this Linux command down a little further:
sudo: The “Superuser Do” command, which temporarily grants administrative privileges to the user. This is necessary because modifying firewall rules requires root access.
iptables: The command-line utility used to manage firewall rules in the Linux kernel. It allows you to create, inspect, and modify the packet filtering rules.
-I: This is a flag for “Insert.” It adds a new rule to a specific position within a chain of rules. This is important because rules are processed in order from top to bottom.
INPUT: This specifies the chain of rules being modified. The INPUT chain processes all incoming packets destined for the local host, making it the correct place to handle traffic intended for a service running on the server.
5: This is the line number where the new rule will be inserted. By inserting the rule at line 5, you ensure it’s processed before the final REJECT rule, which was at line 6. This prevents the traffic from being dropped.
-p tcp: The -p flag specifies the protocol. In this case, tcp (Transmission Control Protocol) is used, as web traffic (like HTTP) runs over TCP.
--dport 3004: This specifies the destination port. The --dport flag tells iptables to apply the rule to packets destined for port 3004, which is the port where the Apache web server is listening.
-j ACCEPT: The -j flag specifies the target or action to take when a packet matches the rule. The ACCEPT target allows the packet to pass through the firewall and reach its destination.
Which results in a newer IP tables rule-set, the following: Our curl command now works fine, from our jumphost.
YAAAY! 😀
Good job, folks! 🙂
And with that.
We’re done with our 12th day task, my dear friends.
My friends, come, it’s almost lunchtime over here. Me needs to cook something for myself soon. But before this, let’s begin our task for Day 11 of 100 Days of DevOps.
For context necessary, my brothers and sisters, I’m also doing this 100 Days of DevOps from Kode Kloud – so that it becomes part a web portfolio to show potential employers.
To help me find a job.
Okay.
Alright, let’s work together and let’s go.
We have the following task briefing from our smart folks at Kode Kloud.
The Nautilus application development team recently finished the beta version of one of their Java-based applications, which they are planning to deploy on one of the app servers in Stratos DC. After an internal team meeting, they have decided to use the tomcat application server. Based on the requirements mentioned below complete the task:
a. Install tomcat server on App Server 1.
b. Configure it to run on port 8086.
c. There is a ROOT.war file on Jump host at location /tmp.
Deploy it on this tomcat server and make sure the webpage works directly on base URL i.e curl http://stapp01:8086
Okay.
First off, we must SSH into our web application server 01 (stapp01).
ssh tony@stapp01
We enter our server’s password.
If you need to refer to details of Kode Kloud infrastructure relevant for this task. Friends, please go over this table:
Once we’re logged in to our web application server 01. We’ll need to install Tomcat server.
Since we’re running on a 9th iteration, or version of CentOS. We’ll need to work with “dnf” for our package manager.
The Linux command above, invokes and asks “dnf” to find for us, and install two things.
java-1.8.0-openjdk-devel
Folks, I believe this is a Java SDK, a software dependency of Tomcat.
tomcat
Tomcat is also installed. As it is our web server for this task.
After dnf finishes installing. We’ll first need to configure our web server.
We do so, with editing a configuration file with an application called: “vi”.
We look for the HTML connector port (that has a default value of “8080”) and replace it with another numerical value “8086”. This changes the port of tomcat from 8080 to 8086.
Following instructions from our task briefing.
Press the key “i” to start making modifications. Find the connector port setting and change the port number to “8086”.
Finally, save changes and then exit the “vi” text-editor application.
Press “esc” followed with keys “wq!”.
Next, we’ll need to start the Tomcat web server service, and enable its auto-start process during boot up.
We do these through entering the following Linux command.
Friends, this is a compound Linux command. Meaning we’ve chained two commands going to “systemctl”. To start the Tomcat service. And then, for it to “enable” the Tomcat auto-start during boot process.
Then, optionally, you can check if Tomcat is already active and running. With this command.
Note: My friends, please remember that the “sudo” password for our web application server can be found over at our table above. Cheers!! 😀
sudo systemctl status tomcat
The print out for this command will tell you the present state, or status of our Tomcat web server service.
Next up.
We need to transfer a Java web application from the jump host. And move it to a system directory inside the web application server. Where Tomcat web server can begin serving it up for web access on HTTP port “8086”.
We call this process, deployment of an app.
Okay, folks.
First, we need to go back to jump host (currently, if you’re following along, we’re. logged in as “tony@stapp01”).
Enter the following Linux command. To move away from current SSH session and fall back to where we were from earlier (jumphost).
exit
Alright.
Now, you should see “thor@jumphost” at the very first portion of your “shell prompt” – sorry, I don’t know what it’s called, really. If you see jumphost there, then we’re good to go.
We’re told that our Java web app is located inside our /tmp/ folder or directory.
You can do the following to quick check.
ls /tmp/
This will print a list of the contents of the /tmp/ folder or directory.
Once we have this done. And if we see the web app called “ROOT.war” inside the /tmp/ folder (or directory).
We do what they call a “secure copy”. With this Linux command.
scp /tmp/ROOT.war tony@stapp01:/home/tony/
Doing this will securely copy over the file “ROOT.war” from our jumphost to our web application server (at this directory /home/tony).
Folks, you’ll need to authenticate with the web application’s server password once more. And if you have proper authorization, the scp program will start copying the ROOT.war file into the web app server.
Let’s unpack the command above, and break it down into smaller pieces first.
The “sudo cp” is necessary because we will be copying a file from our home directory to a system folder. Without “sudo” access, we can’t.
/home/tony/ROOT.war – friends, this is the source directory and file path where the copying takes place.
/var/lib/tomcat/webapps – and this is the system path where we need to “deploy” or copy our web app (ROOT.war) to. Folks, this is a folder where Tomcat expects files it needs to serve up (to make it available on a web browser, for example) to go to, and live.
And then, once this is done.
We do the following to check if we have the web app available on the web port “8086”.
curl http://stapp01:8086
“Curl” is a Linux program that obtains information from things like website pages. That web servers like Tomcat makes available to other things like web browsers.
Over here, I’m feeling down with the weather (it’s cloudy and gloom is upon us). Well, earlier times before lunchtime – I felt under the weather. Still we must find it inside, to do our next exercise with Kode Kloud engineer program. While we can access learning resources. Let’s keep learning. Okay, folks?
We rest right after today’s grind, with what God allows us to work with.
Please don’t feel down. Okay, folks? Instead, let us remind ourselves of things we ought to be grateful to God for.
Like, we woke up alive this morning. Yes? We have a new chance from God, at every new morning we wake up to.
And, we have food on our table. Coffee, too. We have clothes behind our backs. A roof on top of our heads.
Friends, let us remain thankful.
Okay.
My dear brothers and sisters, here we are with our task for Day 10.
We have the following task briefing from good folks at Kode Kloud:
The production support team of xFusionCorp Industries is working on developing some bash scripts to automate different day to day tasks. One is to create a bash script for taking websites backup. They have a static website running on App Server 1 in Stratos Datacenter, and they need to create a bash script named official_backup.sh which should accomplish the following tasks. (Also remember to place the script under /scripts directory on App Server 1).
a. Create a zip archive named xfusioncorp_official.zip of /var/www/html/official directory.
b. Save the archive in /backup/ on App Server 1. This is a temporary storage, as backups from this location will be clean on weekly basis. Therefore, we also need to save this backup archive on Nautilus Backup Server.
c. Copy the created archive to Nautilus Backup Server server in /backup/ location.
d. Please make sure script won’t ask for password while copying the archive file. Additionally, the respective server user (for example, tony in case of App Server 1) must be able to run it.
e. Do not use sudo inside the script.
Note: The zip package must be installed on given App Server before executing the script. This package is essential for creating the zip archive of the website files. Install it manually outside the script.
Folks, first we SSH into the web app server where we need to do the backups from.
ssh tony@stapp01
We enter the server password.
You’ll find it off of this infrastructure table:
Recall my friends, that from Kode Kloud’s task briefing. It mentions that the zip (or archiving) utility isn’t initially set-up and installed into our server instance?
With this, we’ll need to install it. For it’s a dependency that’s required for our backup process to work.
Since we’re running CentOS Linux on our instance (from previous OS details look-up with cat).
Remember… “cat” is a Linux program for displaying the text content of a file, or program. To help us remember, think of your house cats. 😀
Meow-zilla! 😺
Okay, back to our task.
Enough about those cute cats (but scratchy and sometimes some cats bite you, or take a quick nibble at you from out of nowhere – or maybe they too want to be playful sometimes, yes? I think and I agree with folks that some cats do this when they like you. only that I hope it doesn’t land me into a clinic for rabies shots.)
Next, we’ll install “zip” or our archiving utility software with this Linux command.
sudo dnf install zip -y
You’ll need to enter your server password once again, for user “tony”. If you haven’t initially elevated your privileges to “root”.
For a breakdown of what the above Linux command means.
sudo – means this Linux command necessitates root-level access. This’ll temporarily grant root user access, if the password we input is correct aligned with a sudoer user. In this case, user “tony” at server instance “stapp01” is a sudoer.
dnf – this is a package manager specific for a variant of Linux called CentOS. A package manager helps simplify the process of installing, uninstalling, and updating software in your Linux instance.
“install zip -y” – an action, or verb command that tells “dnf” to go find and install the software called “zip”. And that trailing “-y” tells Linux that you agree with pre-installation agreement questions. Like storage requirements, and so on.
Next we move to the “/scripts” directory or folder with:
cd /scripts/
Then we create a bash file for automating our file backup process.
touch official_backup.sh
Entering the Linux command above, will create an empty shell file inside the /scripts/ folder or directory.
After, we invoke our text editor “vi”. To start writing some Bash code into our shell script file.
vi official_backup.sh
Press “i” after your text editor “vi” loads.
And then, start typing the following lines of code, in Bash.
#!/bin/bash

# Variables
SRC_DIR="/var/www/html/official"
BACKUP_NAME="xfusioncorp_official.zip"
LOCAL_BACKUP_DIR="/backup"
REMOTE_USER="clint"     # actual backup server username
REMOTE_HOST="stbkp01"   # backup server hostname
REMOTE_DIR="/backup"

# Step 0: Create a zip archive of the source directory
zip -r "${LOCAL_BACKUP_DIR}/${BACKUP_NAME}" "$SRC_DIR"

# Step 1: Copy archive to Nautilus Backup Server
scp "${LOCAL_BACKUP_DIR}/${BACKUP_NAME}" "${REMOTE_USER}@${REMOTE_HOST}:${REMOTE_DIR}/"

# end of script
Okay.
Folks, let us discuss what the Bash shell script above does, and what it is for. Alright?
Let’s break it down into smaller pieces.
#!/bin/bash
Friends, this is what is called a “shebang”. This line of shell code tells the interpreter to use only Bash for parsing (or reading) and doing the instructions found in this shell script.
# Variables
SRC_DIR="/var/www/html/official"
BACKUP_NAME="xfusioncorp_official.zip"
LOCAL_BACKUP_DIR="/backup"
REMOTE_USER="clint"     # actual backup server username
REMOTE_HOST="stbkp01"   # backup server hostname
REMOTE_DIR="/backup"
The above are called variable definitions. Folks, please think of it like value storage bins. For example, the variable “SRC_DIR” has a value of “/var/www/html/official”.
It makes our code reusable, helps so that you don’t repeat yourself all the time, and modular. Which are best practices, from what I know, when it comes to programming.
Please note, that our backup server details can be found from the above infrastructure table.
# Step 0: Create a zip archive of the source directory
zip -r "${LOCAL_BACKUP_DIR}/${BACKUP_NAME}" "$SRC_DIR"
For the actual backup process. This is our first step, or in programming terms, our step with an index of zero (or step 0).
What it does is the following:
It invokes the software utility “zip” (that we installed first before doing our backup thingamajig.
Then it asks the zip utility program to “recursively” archive files and folders found inside this directory or folder:
/var/www/html/official
And tells zip utility to put the resulting archived zip-file into this directory path “/backup/xfusioncorp_official.zip”
# Step 1: Copy archive to Nautilus Backup Server
scp "${LOCAL_BACKUP_DIR}/${BACKUP_NAME}" "${REMOTE_USER}@${REMOTE_HOST}:${REMOTE_DIR}/"
After we’ve put together our automation (in the form of this Bash shell script). Please make sure to make the shell script executable. This will make it behave more like a program, rather than a text-file.
You can do that with this Linux command.
chmod +x /scripts/official_backup.sh
Next, we securely copy our resultant backed-up zip-file (“xfusioncorp_official.zip”) from our local backup directory (“/backup”) and copy it securely to our Kode Kloud engineer backup server (that you can find at (“stbkp01”)
Folks, before we can securely copy our backed-up zip file to our backup server.
First we need to establish an SSH connectivity from our web application server, under the user “tony” to our files backup server with user “clint”.
One way we can do this, is through the password-less authentication and authorization method we did a few lab exercises ago.
To do so, we enter the following command, from our web application server (tony@stapp01).
ssh-keygen -t -rsa
After you enter this Linux command. It will ask you for the place or directory where you want to save your resulting SSH keys. But prior to this, the program might ask you for a passphrase. This is an extra layer of security where you need to define a password. You can opt not to anymore, and press “enter” when you see the passphrase request.
However, it will add extra security if you do create a password, or passphrase for your SSH keys.
ssh-copy-id clint@stbkp01
This Linux command tells your web application server to securely copy its generated public key to our team’s file-backup server. With the user and hostname “clint@stbkp01”.
After enter your password, you should be able to transfer a copy of your public key from your web application server (stapp01) to the backup server (stbkp01).
Finally, once the tasks above are done. Please enter this command from your Linux instance.
/script/official_backup.sh
Remember, from the steps above, that we’ve made our “official_backup.sh” shell script into an “executable” file.
Meaning, if you enter the path on Linux for an executable. It will execute the instructions inside, much like any standalone program.
My friends, if you don’t see any errors after our backup shell script runs.
Sign-up with your valid and working email address. And you should be good to go.
If I remember it correctly, you don’t need a credit card for you to learn off their hands-on program.
However…
For their learning lectures inside the academy. You’ll need to pay a subscription cost, correlating with the kind of plan you’ll choose from their selection. Alright, folks?
Okay, let’s get started for today’s task.
We have MariaDB. Or… for lack of it, according to our task, it is down and unavailable for one of our applications. Without it, our app will not work at all.
So, we need to bring it back up again, and online.
Yes, sounds like a plan.
Here’s the details.
There is a critical issue going on with the Nautilus application in Stratos DC. The production support team identified that the application is unable to connect to the database. After digging into the issue, the team found that mariadb service is down on the database server.
Look into the issue and fix the same.
Oh, one more thing, in case you’re wondering about it. Nautilus is a web application from a fictitious tech start-up or company that Kode Kloud has set-up for us to train from, as “on the job” trainees with their Kode Kloud engineer program.
And, 100 Days of DevOps, what we’re trying to do, or to become a part of presently, is part of that learning program. It’s good that they made it free and available to all folk.
God bless them.
First off, my friends I’m writing this weblog of learnings (and mistakes) so that I could find and hopefully land a job.
For our task at hand, we need reference into the infrastructure of our Kode Kloud engineer ecosystem.
This means, we need to know what server machines are available to us. And if possible, how to access what we need to help do our task.
We’re looking for the server where the MariaDB (Maria Database) is installed, configured, and where it’s suppose to run to serve our web application (called “Nautilus”).
Here is the infrastructure details, according to Kode Kloud’s website.
Okay.
Friends. According to this, the database server is at the hostname called “stdb01”.
It could be the Linux instance that hosts our Maria DB service. We’ll need to check it out, my friends.
We need to log into our database server.
ssh peter@stdb01
We enter the database server password. That you can find from the infrastructure table above.
Okay. We’re able to log in to our database server. That’s good.
Alright.
Wait. Hang on, my friends. I’ll grab my mug of coffee, and take a sip of coffee – for some coffee goodness. ☕
I hope you’re also able to have some coffee from where you are, my brothers and sisters.
Folks, I need the caffeine in the morning.
Thanks for being around with me.
We input this Linux command, to check if MariaDB is on our database server.
sudo systemctl status mariadb
According to the print out, the software MariaDB is installed inside our database server.
However, it is currently stopped and disabled.
When we attempt to start mariaDB. We can’t.
sudo systemctl start mariadb
We’ll need to find out what’s going on, my friends.
And work with what looks like a dependency. To fulfill it, so that we can hopefully get mariaDB started as a service.
Folks, a dependency is something we call a software, or a service that we need to be installed, or running first – before we can add or install an additional software, or service. It needs to come first, in a way of saying.
Like you need to have some coffee beans first, before you can brew coffee.
Hmm…
My brothers and sisters, it seems I made a mistake here.
Hang on, let’s trace our steps. And try to learn from our mistakes. We pick up the lessons, okay my friends?
From our database server. We can enable mariaDB, with a system utility called “systemctl”.
sudo systemctl enable mariadb
However, we can’t start mariaDB for an unknown reason.
sudo systemctl start mariadb
We’ll need to dig deeper, my brothers and sisters.
This Linux command above, if it works, should resolve our database server.
This error stream or error message points us where we need to look. For our troubleshooting.
We need to look at the “systemctl status” and “journalctl”.
These are services that manage and look after Linux processes. Processes is another name we call software that runs to provide a service to an instance, or computer for this matter.
Let me look into this one for a while, my friends. And I’ll get back to you if I find anything worth the while to share. Sorry.
Friends, I found this link from the trace of the error logs.
It might be helpful. For it looks like the web documentation of mariaDB.
Let’s take a look.
Here’s what we know so far.
We’re able to login to our database server (yay!! :D)
We have mariaDB installed (also, yay!! XD)
However, we can’t start mariaDB, but we can enable it (hmmmmm…. 🤔🤔🤔🤔🤔)
Nothing yet.
I’m at my wits end! 😆
But we must keep trying.
We’ll learn something new this way. Okay, friends?
So my brothers and sisters, we’ve found the config file for mariaDB.
Thanks to their documentation online. Kudos to their folks.
However, for some another unknown reason, we can’t modify or even create a config file that Linux can read and implement.
Sorry, I’ll have to keep working on it.
We’re almost out of time. We have a time-limit for our task.
I’ll re-do the task later on, my friends.
Our task is not yet a failure. I believe it is a failure if we full give up.
My friends, for now let us re-group and re-convene later on, to tackle this task of troubleshooting (or fixing a broken, or faulty component from mariaDB implementation).
Again, thanks for being around with me.
God bless us, one and all. 🙌
Okay, folks.
Sorry.
I just had breakfast. And now having a bowl of cookies and some coffee.
Me trying to read mariaDB’s web documentation.
To find something helpful.
While also, trying to ask for some help online. Asking around, I found one that has the same lab exercise.
I’ll implement later what I learn off of these, okay folks?
Peace be with you all.
Okay, folks.
I’m done with eating some cookies off of a bowl. And my coffee’s gone now too.
Don’t worry my friends, I’m also now trying to watch my caffeine intake along with sugar intake too.
We’re getting old.
Alright…
According to someone from Burma. As the person whose tutorials I found online is speaking in Burmese. Thanks to him for that.
In order to get our mariaDB started. We need to do two things first. And that’s to:
Check if “/var/lib/mysql” exists, if it exists it needs to be empty.
I didn’t know this before, sorry folks, I’m not an expert either with databases.
sudo rm -frdv /var/lib/mysql
If the folder, or directory isn’t empty. Force Linux to remove all pre-existing files and folders inside the directory.
Otherwise, starting mariaDB will fail again.
sudo mkdir /var/lib/mysql
Then, re-create a fresh folder/directory without any content inside. With the “mkdir” Linux command.
Then you need to change owners with a Linux command. “chown” to enable mariaDB service to access and utilize the directory at /var/lib/mysql
This is my personal understanding of what I found.
sudo chown -R mysql:mysql /var/lib/mysql
Folks, you can find the same tutorial (note that the language is in Burmese). Here: https://youtu.be/K1XCIpp6Ts4
Credits to brother developer from Burma, for the YouTube tutorial.
Don’t forget to start the mariaDB service.
sudo systemctl start mariadb
Check the service status to verify if mariaDB has properly started.
sudo systemctl status mariadb
Thanks, and I think that’s it for now, my brothers and sisters.
God bless!
‘Til next time.
Kapayapaan nawa’y suma-inyo at suma-ating lahat, mga kapanalig at mga kaibigan.